VR MOLECULES PRO - User Guide
|
This guide applies to VR Molecules Pro, available as a Windows-only standalone application. |
|
|
VR Molecules Pro functions are divided into five groups. |
|
|
1. |
Visualization functions, aiming at optimizing the observation of molecule shapes and motions. |
|
2. |
Molecule selection and parameter adjustment functions, allowing an interactive exploration of relations between molecule motion or energy, and physical parameters. |
|
3. |
Page management functions, used to define and organize multi-page presentations including text and voice explanations. |
|
4. |
Document management functions, used to save presentations for later reloading or for publishing through the Internet. |
|
5. |
|
In Figure 1, click in any boxed area or orange title bar to skip to the section describing the corresponding group of functions, or on any item in the associated list for explanations about a particular function.
Please note that some buttons of functions, notably those related to text and voice explanations, are not used anymore.
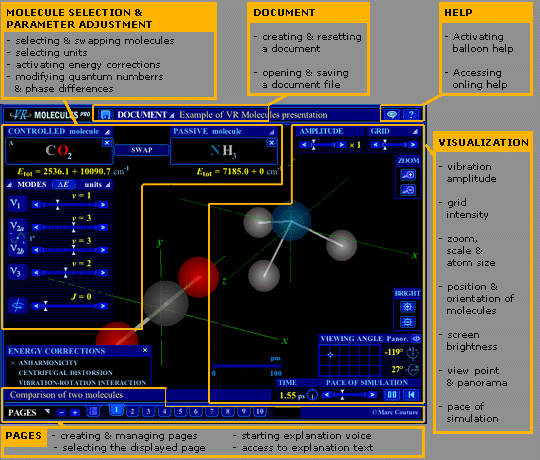
Figure 1. Screen shot of VR Molecules Pro interface, showing the five groups of functions (boxed areas). Click on parts of the figure to jump to related explanation.
[ top of page ]
1. Visualization functions
VR Molecules Pro visualization functions aim at optimizing the observation of molecule configurations and motions, and at making measurements of relevant quantities easier. Physical properties of molecules (quantum numbers, energy corrections, etc.) are unaffected.
The controllers for these functions are found on the right-hand side of the screen. Clockwise from top of the screen, one finds the following controllers.
|
The AMPLITUDE slider adds a
variable exaggeration factor of up to 5 to the
displayed amplitude of oscillations, in order to
help observe or measure small amplitudes. Note that
as the distance between atoms doesn't change when
the amplitude exaggeration factor is modified, the
overall scale (lower central part of the screen)
remains the same. |
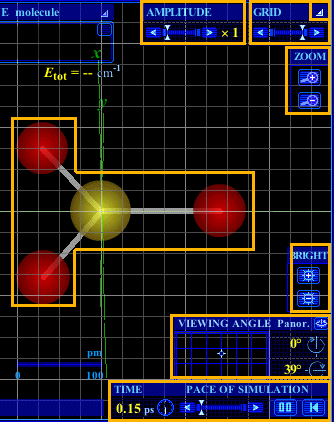 Figure 2. Visualization functions. Click in any box to go to the explanation of the function. |
The GRID slider turns on and change
the intensity of the background grid, whose size adjusts
automatically to zoom level.
Ctrl-click on left arrow turns off the grid.
Hiding/showing the visualization controllers
The triangle-shaped button over the right end
of the GRID slider toggles the visualization
controllers.
Ctrl-click on the button toggles also the mode
controllers.
The ZOOM buttons ![]() and
and ![]() modify the overall scale of the simulation, including the
size of atoms and bonds. The scale is displayed in the lower
central part of the screen.
modify the overall scale of the simulation, including the
size of atoms and bonds. The scale is displayed in the lower
central part of the screen.
Ctrl-click on these buttons change the size of the atoms.
The default value of atom radii is 1/5 the van der Waals
radii. The minimum value is zero; then, only bonds are
displayed.
The BRIGHT buttons ![]() and
and ![]() allow to adjust the global brightness/contrast of the scene
according to the characteristics of the monitor or viewing
device. Five levels are available; the level at time of exit
is saved for the next opening of VR Molecules
Pro.
allow to adjust the global brightness/contrast of the scene
according to the characteristics of the monitor or viewing
device. Five levels are available; the level at time of exit
is saved for the next opening of VR Molecules
Pro.
Molecule position and orientation
The position of a molecule can be changed by clicking-and-dragging any of its atoms. Note that a molecule cannot be dragged to the other half of the screen, in order to maintain the link between its position and the mode controllers (see below the description of these controllers).
The VIEWING ANGLE, that is the point of view from which the molecules are observed, is changed by clicking-and-dragging any atom while pressing the Ctrl key. The point of view is always the same for both atoms.
|
One can also change the point of view by clicking-and-dragging the cross-shaped cursor in the VIEWING ANGLE grid (see adjoining figure). Values of horizontal and vertical angles (in degrees) are displayed next to the grid. |
|
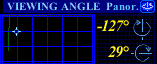
The Panor. button, located just after the words VIEWING ANGLE, turns the panorama mode on and off. In this mode, the point of view rotates continuously in the horizontal plane.
The PACE OF SIMULATION slider modifies the rate of the simulation. The elapsed time (in picoseconds, or 10–12 s) is displayed next to a small clock.
The buttons ![]() and
and ![]() ,
located next to the slider, make the simulation pause or
resume, and reset the time, respectively.
,
located next to the slider, make the simulation pause or
resume, and reset the time, respectively.
2. Molecule selection and parameter adjustment functions
These functions modify the identity and the properties of the displayed molecules, as well as the way some parameter values are expressed. Note that a molecule must be on the left-hand side of the screen if its parameters are to be modified; one thus speaks of the CONTROLLED molecule.
The controllers for these functions are located on the left-hand side of the screen. Counterclockwise from top of the screen, one finds the following controllers.
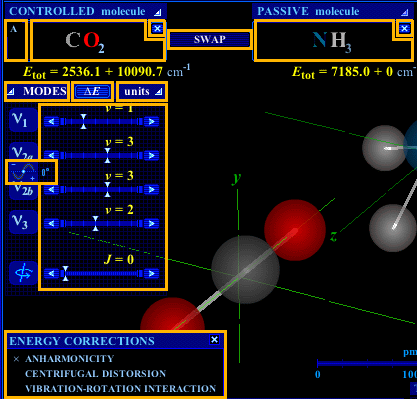
Figure 3. Molecule selection and parameter adjustment functions. Click in a boxed area for explanations of the corresponding function.
Molecule selection and parameter adjustment functions
Clicking on any one of the two boxes (named CONTROLLED molecule and PASSIVE molecule, respectively) bearing molecular formulae allow to select, from a list, the molecule to be displayed on this side of the screen, or to hide the molecule displayed there.
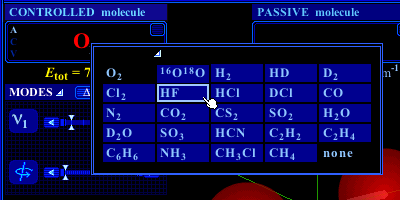
Figure 4. List of available molecules.
The SWAP button, which appears between the two boxes when two molecules are displayed, transpose the two molecules. This allows one to modify the parameters of the right-hand side, passive, molecule by changing its status from passive to controlled.
The total energy is displayed under the box of the displayed molecule(s). It is divided in two parts : the base energy, which consists of the sum of the fundamental (zero-point) energies of the active vibration modes, and the available energy, which is the sum of the vibration and rotation energies of all the modes.
|
Clicking on the triangle following the word units opens a pull-down menu which allows to choose the unit of the quantity displayed on top of the quantum numbers sliders. One can choose between the quantum numbers themselves (υ, J) and three different energy units. Note that when the quantum number option is selected, the total energy (Etot) values are given in cm–1 units. |
|

This function is available only for diatomic molecules. Clicking on the ΔE button opens (or closes) a dialog box in the lower left corner of the screen (see Figure 3). In this dialog box, one can switch on and off, for the controlled molecule, any one of three energy corrections included in the simulation: anharmonicity, centrifugal distortion, and vibration-rotation interaction. Active corrections for a molecule are displayed by their first letter (A, C and V, respectively)on the left of the molecule formula.
The sliders located below the MODES title bar modify the vibration (up to 9 modes) and J rotation quantum numbers of the controlled molecule, up to a maximum value of υ = 5 for vibration modes and J = 30 for rotation. One can also put the vibration energy to zero in order to help visualize individual modes. It is worth mentioning that this is a completely artificial possibility, with no corresponding quantum number.
Ctrl-click on left arrow sets all vibration modes to E = 0. Ctrl-click on right arrow sets all vibration modes to υ = 0.
Clicking on the triangle-shaped button at the left of the word MODES toggles the display of all quantum numbers sliders, which can help observing the left-hand side molecule. Ctrl-click on the button toggles also the visualization controllers (on the right-hand side of the screen).
|
Clicking in the right or left half of the sine curve located between the names of degenerate vibration modes (with subscripts a and b; see adjoining figure), increases or decreases the phase difference between the two modes. The value (in degrees) of the phase difference is displayed on the right of the sine curve. |
|

3. Page management functions
The page creation and management functions are controlled by a series of buttons located in the lowermost area of the screen. Most of them are described in Figure 5 below.
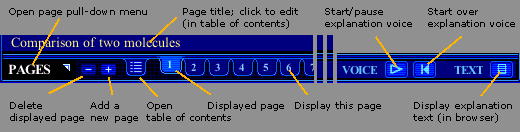
Figure 5. Functions in the page management area.
|
A few of these same functions, as well as some others, can be found in the pull-down menu opened by clicking the word PAGES (see adjoining figure). These other functions are the following. |
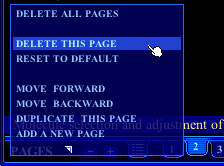 |
- Delete this page
This does the same than the - (minus) button located immediately to the right of the PAGE button.
- Reset to default
This resets all visualization parameters (view point, zoom, atom locations, etc.) of the displayed page to their default values, with no change to the choice of displayed molecules and their physical parameters (quantum numbers, energy corrections, etc.).
- Move forward or backward
This changes the order of the pages in the presentation by swapping the displayed page and the following or previous one.
- Duplicate this page
This adds a new page completely identical to the displayed page.
- Add a new page
This adds a new page with default content (O2 molecule). This does the same than the + (plus) button located to the right of the PAGE button.
The table of contents (Figure 6) is used to enter or modify, by clicking on them, the titles of the presentation and of its pages. One can also access a given page by clicking on its number.
Checkboxes at the end the page titles, formerly associated with text and voice explanation files, have no effect in the current version of the application.
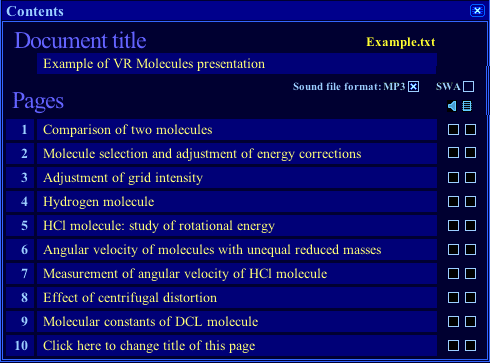
Figure 6. Table of contents.
[ top of page ]
4. Document management functions
|
The document creation and management functions are available in the pull-down menu opened by clicking on the DOCUMENT button, in VR Molecules Pro title bar. This option allows to load a presentation, available online or previously saved on your hard drive (see File saving). To do so, one simply enters the file name in the Open dialog box, either alone (for a local file, on the hard drive) or as a complete URL (for a file available on the Web), including the http:// part (Figure 7). |
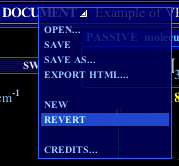 Click on any menu option to go to the corresponding explanations. |
In both cases, the .txt extension is not required, and one may use the shortcut keys Ctrl-C, V, X and Z (to copy, paste, cut, and cancel) to enter content into the field.
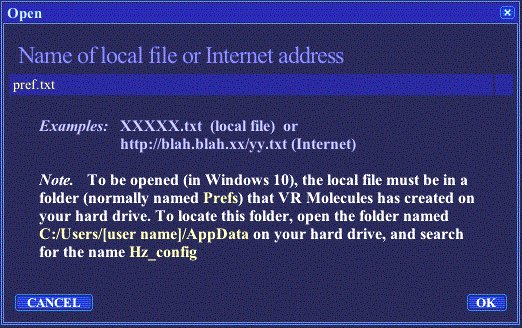
Figure 7. Open document dialog box.
One can save on one's hard drive the content
file of the presentation displayed by VR Molecule. The
SAVE option of the DOCUMENT pull-down menu, or
a click on the ![]() button located on its left, either saves a file with a
generic name or with the same name as the one that has been
opened. The name under which a file will be saved is
displayed in the table of contents (Figure 6),
under the document title.
button located on its left, either saves a file with a
generic name or with the same name as the one that has been
opened. The name under which a file will be saved is
displayed in the table of contents (Figure 6),
under the document title.
The option SAVE AS... opens a dialog box (Figure 8) in which one can enter the filename and, if needed, modify the title of the document. The .txt extension need not be entered in the dialog box; if missing, it will be automatically added.
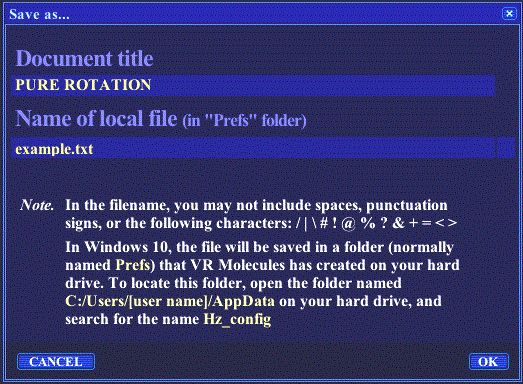
Figure 8. Save as... dialog box.
This text-format content file is saved in a "special" folder (no other folder can be chosen). This folder, named Prefs, is automatically created in a sub-folder of C:/Users/[username]/AppData/Roaming/Macromedia/.... To locate it on your drive, search for the file named "Hz_config" in the AppData folder. This file was created (along the Prefs folder) when the application was first launched.
This option creates a new document containing only one page with the default molecule. This action may be cancelled with the REVERT option, until a new document is created or opened, or the document is saved.
This option replaces the displayed document to its state at the latest of these events:
- just before the simulation was launched or (online
version) restarted by refreshing the page in the
browser;
- just before the actual document was opened;
- just before a new document was created by one of
these options: NEW or DELETE ALL PAGES;
- when the actual presentation was last saved.
This option displays VR Molecules Pro "splash screen".
[ top of page ]
5. Help functions
VR Molecules Pro help functions include the user guide and balloon help; these are activated by buttons in the right part of the title bar.
- The user guide (this document) is
displayed in the browser when one clicks the button
 .
.
Note that with the stand-alone version of VR Molecules Pro, the local version of the guide that has been downloaded with the application will be used only if your default browser is Internet Explorer. Other browsers will try to retrieve the online version of the guide, which will result in an error if you're not connected to the Internet. However, you can manually open the local version by clicking on the file (shortcut) named UserGuide.htm located in the same folder than VR Molecules Pro.
- Balloon help is activated or
deactivated by clicking on the
 button, which flashes when balloons are activated. Help
balloons appear when the cursor stays at least one second
over a button or any clickable area.
button, which flashes when balloons are activated. Help
balloons appear when the cursor stays at least one second
over a button or any clickable area.
Last updated: April 26, 2020